
From Pinot to Primer: The DIY Project That Shifted Everything
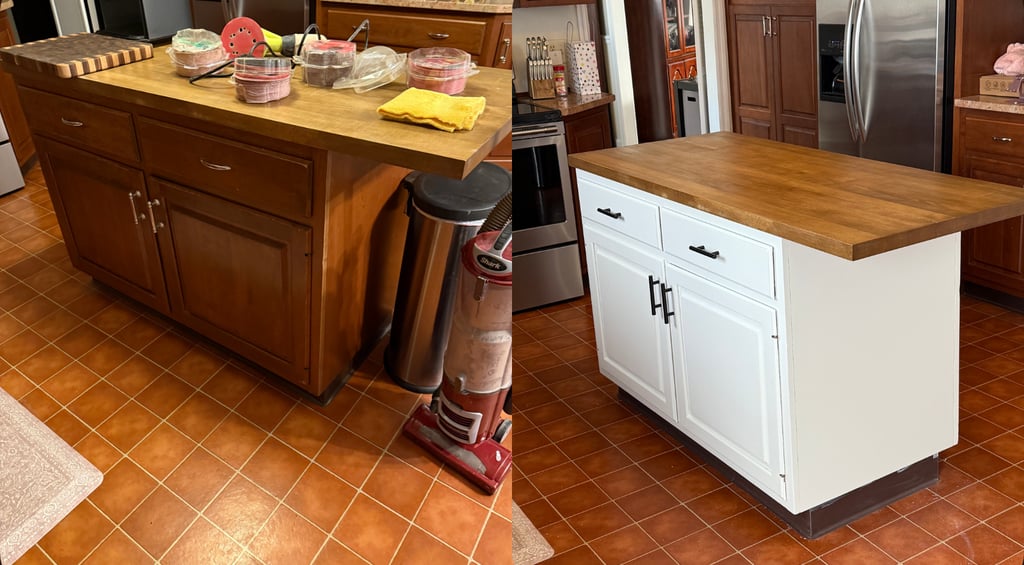
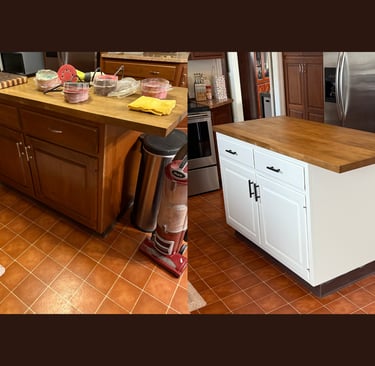
Let me set the scene. One random Tuesday morning, I looked at my kitchen island the same way you look at low-rise jeans from 2005. With judgment. With disappointment. With a very clear, “You gotta go.” It wasn’t just outdated. It wasn’t just orange. It wasn’t just shiny in that specific 1990s “builder-basic-but-make-it-glossy” way. It was a mirror showing me a version of myself I no longer connected to. And here's the thing...I didn’t expect to write a blog about paint! You see, I’ve been on a journey of becoming me again. A clearer me. A stronger me. A me who had recently made the very real decision to put down the nightly Pinot Grigio and stop ending every day with a pour that was slowly becoming a pattern. So instead of grabbing a glass of wine that Tuesday night… I grabbed a sander. Instead of numbing out, I decided to do something. Instead of pouring wine, I poured intention. And THAT is how a 90s kitchen island became the first step in a much bigger transformation. Here’s how it went down.
LIVING BY DESIGN
Why I Decided to Refresh Instead of Replace
My island is solid. The whole kitchen has great bones.
What it didn’t have was personality.
And honestly? I needed a win. A project I could control. Something that made me feel like I was moving forward in both my home and my life.
Refreshing the island became the perfect metaphor: a small step with a big impact.
And if I’m being really real, this project started at a moment when I needed a reset. I had stopped ending my days with a glass of Pinot Grigio, and suddenly had extra space in my evenings. I needed something calming, something intentional. I wanted a ritual that grounded me instead of distracting me. Painting became that thing. It let me create instead of escape.
Turns out, choosing a paintbrush over Pinot reshaped more than my island. It reshaped me.
Before we get into it, just know this: I didn’t use anything fancy.
A cleaner, a sander, primer, good brushes, and a paint color that made me gasp a little.
I'll put the full supply list at the end.
Now.. Here's how it all went down!
Step-by-Step: The Real Process
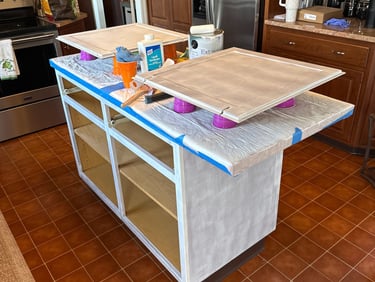
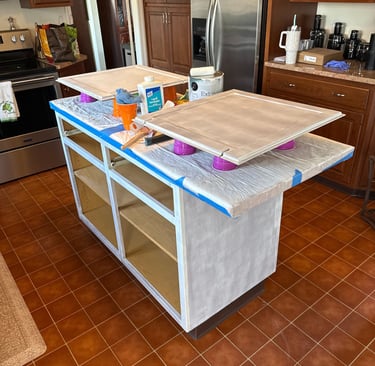
Step 1: Remove all hardware and label everything
Trust me, this saves your sanity later.
I used sandwich bags, solo cups, and a Sharpie, nothing fancy. Every hinge, screw, and door had its own label like a proper crime scene. If you’ve ever seen that street ‘shell game’ where a guy hides a ball under one cup, shuffles them around at lightning speed, and then asks you to guess where it is? That’s EXACTLY what removing cabinet doors felt like. Except I was the guy running the game… AND the confused player trying to keep up.
Step 2: Clean + Degloss
Do not skip this.
Paint will NOT stick to kitchen grease, fingerprints, or that “mystery shine” on old cabinets.
I wiped everything down, let it dry, then used a deglosser to dull the finish.
Step 3: Tape like you're setting boundaries
Cover and FROG TAPE on everything!! Floors. Walls, Adjacent cabinets. Things I didn't even plan to bump into...I DID!
Because here's the truth: at some point, you WILL lean over, brush fully loaded, and swipe a surface you had no intention of painting.
Future-you will thank Present-you for taping like a professional and not like someone who trusts her coordination more than she should.
Step 4: Sanding...aka The Dustpocalypse
Not a deep sand — just enough to scuff the surface. Then use the brush attachment and vacuum, wipe with a dry cloth, and then with a damp tack cloth. This will ensure your primer sticks.
Sanding is not a task.
It is a personality test.
And sanding inside?
It is a full spiritual awakening.
Dust gets EVERYWHERE.
It will disrespect your home.
It will disrespect your lungs.
It will disrespect your hopes and dreams.
If you can sand outside or in the garage, do it.
If not, cover your entire kitchen like an FBI raid is happening.
Sanding taught me this:
Sometimes you have to rough up the surface before anything new can stick.
That one hit deeper than expected. :)
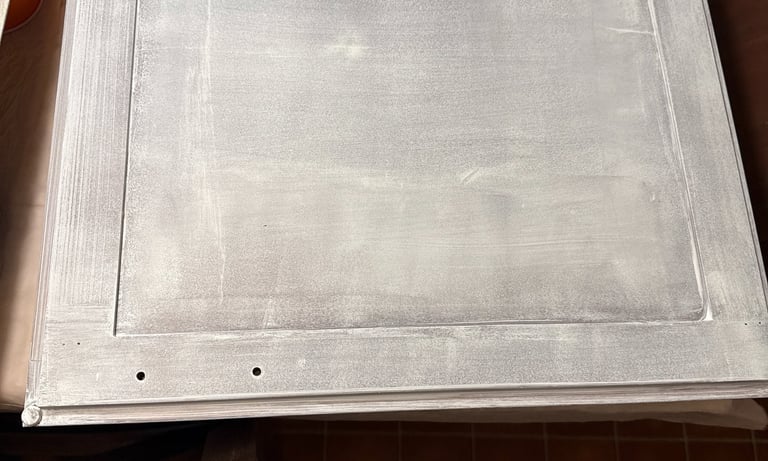
Step 5: Prime...and Then Do It Again
I used Sherwin-Williams Extreme Bond Primer because, at this stage of my life, I’m only bonding with things that actually last. ;)
One coat?
Cute.
Two coats?
Better.
Do not rush primer.
Do not skip primer.
Do not disrespect the primer.
Transformation needs a solid foundation.
This applies to paint AND personal growth.
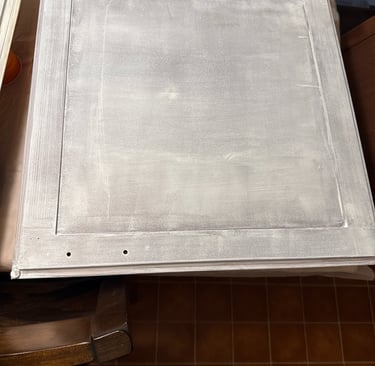
Step 6: Sand Between Coats (Because smooth takes work)
You can use a sander sponge with 220-grit or higher. Little tip: the higher the grade, the lighter the sand. You DO NOT want to use 60-grit at this stage of the game.
Either way, don't skip it!
Between primer coats.
Between paint coats.
Between moments of existential crisis.
This step is small but mighty.
It’s what gives you that professional, factory-finish smoothness instead of “I painted this while emotionally unraveling.”
Which, let’s be honest, might’ve been partially true.
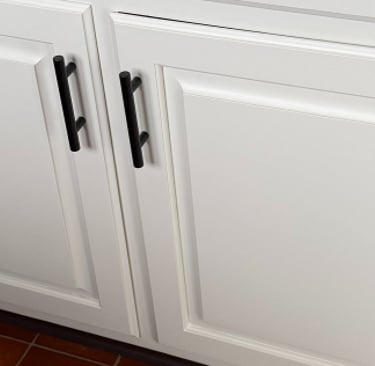
Step 7: Paint- Or As I Call It, Therapy With a Brush
My color: Sherwin-Williams Oyster White
Finish: Emerald Urethane Satin
Mood: “Please don’t look yellow next to my orange floors.” (Eventually, those will get a glow-up, too!)
The first coat always looks horrifying.
The second coat looks slightly less horrifying.
The third coat looks like redemption.
Painting became my evening ritual… the new one that replaced wine.
Roll.
Brush.
Step back.
Let it dry. (Overnight)
Repeat.
Heal.
Slowly, that island transformed.
And honestly?
So did my evenings.
Step 8: Hardware - The Part Where She Became HER
Black hardware on Oyster White is the eyeliner that transforms ‘nice’ into ‘DAYUMMM, okay!!’
Putting the handles on felt like giving the island her final form.
Pro tip:
Put the hinges on the frame FIRST, then hang the doors. Then the cabinet pulls.
Otherwise, you will end up on the floor fighting a cabinet door as if it owes you money.
Tools I Used and Loved (for those who love a clean list)
Some of the items below I already owned because… apparently I’ve been stockpiling DIY supplies like a woman preparing for an HGTV emergency.
Don’t judge — everyone copes differently. Here you go, in case you want to start your own inventory of stuff!
Prep + Tools
KrudKutter cleaner
120-grit sand pads220 Sanding Sponge
Tack cloth
Drop cloth / old sheet
Frog Tape
Solo cups
Vacuum
Shop towels
Dad’s old chucks (optional but iconic)Paint + Application
Sherwin-Williams Extreme Bond Primer
Sherwin-Williams Emerald Urethane Trim Enamel
High-density foam rollers
Purdy or Wooster angled brushHardware
Matte black pulls
Hardware template
Drill + bitsTotal cost: $298.28
Total transformation: priceless + emotionally therapeutic
Final Thoughts: The Island Changed...But so did I
This wasn’t just about making the kitchen prettier.
It was about reclaiming my evenings.
Reclaiming my focus.
Reclaiming myself.
Every coat of primer felt like letting go.
Every coat of paint felt like choosing something new.
Every moment I picked up a brush instead of a bottle felt like a quiet victory.
It’s not finished — not the kitchen, not me — but this island?
She’s the beginning.
And next week?
I start the rest of the cabinets.
But today?
Me and my knees are off duty.
Want More Projects Like This? Stay tuned, the rest of the refresh is coming soon.


This post contains affiliate links. As an Amazon Associate, I earn from qualifying purchases.